In this tutorial I’ll show you step by step how to get started with Ethereum by learning to use the command line to create a smart contract and deploy to your own private blockchain for testing. This will give you a basic understanding before moving onto using more complex development environments.
Installing the client tools
First we’ll download the client tools for running a node on your computer. Official instructions for installing the tool can be found here: Ethereum client tools
I use a mac, so commands for me were quite simple using the brew package manager:
$ brew tap ethereum/ethereum
$ brew install ethereum
The steps for other platforms can be found here: Building Ethereum
After installation, test that all is working by running geth the Command Line Interface.
$ geth console
$ exit
Setting up a private testnet
First we will create a genesis file, which will be used to build your own private blockchain. In this example, I have created the file in the following directory structure:
~/dev/ethereum-demo/genesis.json
In this file, add the following content:
{
  "nonce": "0xdeadbeefdeadbeef",
  "timestamp": "0x0",
  "parentHash": "0x0000000000000000000000000000000000000000000000000000000000000000",
  "extraData": "0x0",
  "gasLimit": "0x8000000",
  "difficulty": "0x200",
  "mixhash": "0x0000000000000000000000000000000000000000000000000000000000000000",
  "coinbase": "0x3333333333333333333333333333333333333333"
}
In the console type:
$ geth --datadir ~/dev/ethereum-demo init ~/dev/ethereum-demo/genesis.json
You will now have a private blockchain database setup in the using the custom genesis block.
Creating an Account and adding some Ether
Now that we have created a private blockchain. Next we will create a coinbase account and load it with ether in order to execute transaction. First we create the account and then update the genesis file with an initial balance for that account.
Create a file the contains the account password, and then we use this file to create a new account.
$ sudo echo "pa55w0rd123" >> ethereum_pwd.txt
$ geth --datadir ~/dev/ethereum-demo/ethereum-data --password ~/dev/ethereum-demo/ethereum_pwd.txt account new
  Address: {5f94e3b516fc5ddc9f808e5fa8a3a1b5e85e34d5}
Invent your own password rather than use mine above. The output is the new hash address of the new account.
Now edit the genesis file with the new address and allocate a balance, like so:
{
  "nonce": "0xdeadbeefdeadbeef",
  "timestamp": "0x0",
  "parentHash": "0x0000000000000000000000000000000000000000000000000000000000000000",
  "extraData": "0x0",
  "gasLimit": "0x8000000",
  "difficulty": "0x400",
  "mixhash": "0x0000000000000000000000000000000000000000000000000000000000000000",
  "coinbase": "0x3333333333333333333333333333333333333333",
  "alloc": {
    "5f94e3b516fc5ddc9f808e5fa8a3a1b5e85e34d5": {
      "balance": "10000000000000000000"
    }
  }
}
Note: the alloc address that you will use, will be different than the one above.
Now we will check the account balance. Run the following geth command to start the interactive command session.
$ geth --datadir ~/dev/ethereum-demo/ethereum-data --nodiscover --password ~/dev/ethereum-demo/ethereum_pwd.txt --unlock 0 console
Type the following to start mining the first block:
> miner.start(); admin.sleepBlocks(1); miner.stop();
The first time you start mining will take some time to complete as your node will need to generate a 1GB dataset for the Proof of Work algorithm. You will see “generating DAG” messages in the other console log, which took about 8 minutes on my laptop. You can read more about this here: https://github.com/ethereum/wiki/wiki/Ethash-DAG
> balance = eth.getBalance(eth.coinbase)
  10000000000000000000
> web3.fromWei(balance, "ether")
  10
It should display a balance of 10 eth.
More commands for the Javascript Command Line interface can be found here:
Javascript Command Line Interface
Creating our First Smart Contract
We will create a smart contract that will simply multiply an unsigned integer by 7.
contract multiplier {
  function multiply(uint a) constant returns(uint d) {
    return a * 7;
  }
}
First we compile the contract and then we will deploy it on our own testnet by mining. The following diagram depicts this process:
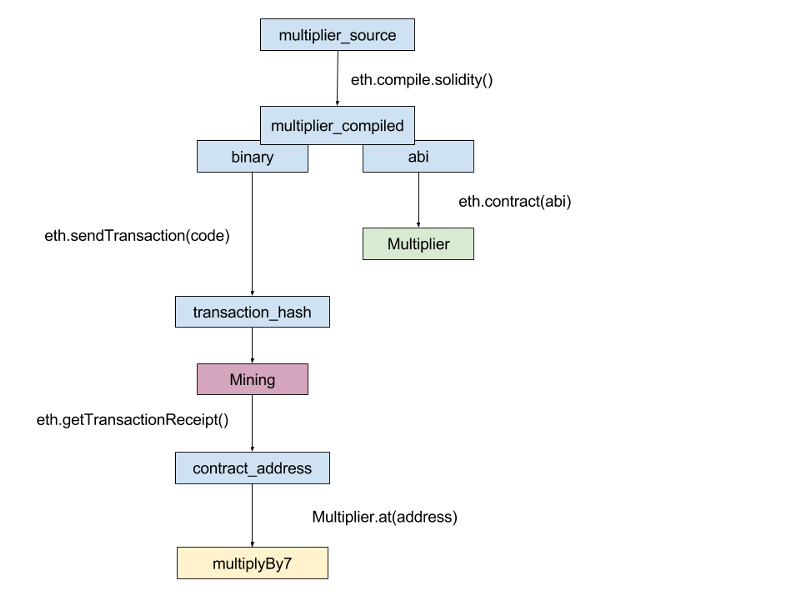
Compiling and deploying the contract.
Since this is an introduction to give you a feel of the basics, we are doing everything manually using the command line tool. However, in practice you would use a development tool such as Dapple or Truffle
to make the process more streamlined and faster.
The first step is to compile the contract using the command line, but in order to do this we need to have the contract as one line of text. The easiest way to do this is to use a tool as follows:
Using the solidity compiler, we compile the contract.
> multiply_source = "contract multiplier { function multiply(uint a) constant returns(uint d) { return a * 7; } }";
> multiply_compiled = eth.compile.solidity(multiply_source);
This gives two pieces of important information needed for creating and using our contract.
- multiplier.code — The compiled binary code that we will deploy onto the blockchain.
- multiplier.info.abiDefinition — The Application Binary Interface (ABI) definition used for encoding & decoding transactions we send to and from the contract. This would be published on a standard web server somewhere for other developers to consume in order to be able to write code that can interact with this contract.
We will store these in separate variables called binary and abi. Then we create the contract by sending a transaction message to the blockchain using the account we just created. When we send the contract we have to specify the maximum gas we are prepared to pay. But since this is a testnet and won’t cost us anything, we just set this at an arbitrary high number in order for the transaction to execute.
> primary = eth.accounts[0];
> binary = multiply_compiled.multiplier.code;
> abi = multiply_compiled.multiplier.info.abiDefinition;
> transaction_hash = eth.sendTransaction({from: primary, data: binary, gas: 1000000});
This returns a hash for this transaction, but the contract hasn’t been deployed yet. We have to mine a block for that to happen.
Altering the state of the Ethereum blockchain, such as deploying a contract, only can occur when transactions are validated and executed by miners.
So next we tell our private testnet to start mining in order to update the testne with our new contract and stop after creating one block:
> miner.start(); admin.sleepBlocks(1); miner.stop();
Interacting with the contract
Now that the contact has been deployed, we need to know its address in order to communicate with it. We do this using the transaction hash.
> transaction_receipt = eth.getTransactionReceipt(transaction_hash);
The transaction receipt will show the blockNumber that the miner deployed the contract to, the contractAddress and the amount of gasUsed that would have been used if it were deployed on the public blockchain.
Which on my current version came to 33,130 (g). Which in current gas prices of 1 g = 10 szabo, is 0.3313 (eth) or $0.046
Gas fees can be found here:
http://ether.fund/tool/gas-fees
Now we use the abi and contract address to create an instance of the contract and communicate with the contracts multiply() function.
> contract_address = transaction_receipt.contractAddress;
> multiplyBy7 = eth.contract(abi).at(contract_address);
> multiplyBy7.multiply.call(6);
  42
Creating our Second Smart Contract
The second contract we will create is a little more complex. It will store some state on the blockchain and also be a child of another contract called mortal.
contract mortal {
  address owner;

  function mortal() {
    owner = msg.sender;
  }

  function kill() {
    if (msg.sender == owner) suicide(owner);
  }
}

contract greeter is mortal {
  string greeting;

function greeter(string _greeting) public {
    greeting = _greeting;
  }

function greet() constant returns(string) {
    return greeting;
  }
}
The purpose of the parent contract is to supply a kill() method that can be inherited by any child contract. The kill() method uses a special internal command called suicide() which destroys the contract so that it can’t be used again.
The greeter contract has a constructor that takes a string as a parameter which it stores this value on the blockchain. We can later access the value by using the greet() method.
In the previous example, the contract didn’t have a constructor, so we could deploy it on the blockchain using only the binary code.
However, this time the contract has a constructor that is used to create the contract during deployment. So we have to use the ABI definition in order to send the right parameters in a transaction to the contract’s constructor using the new() function.
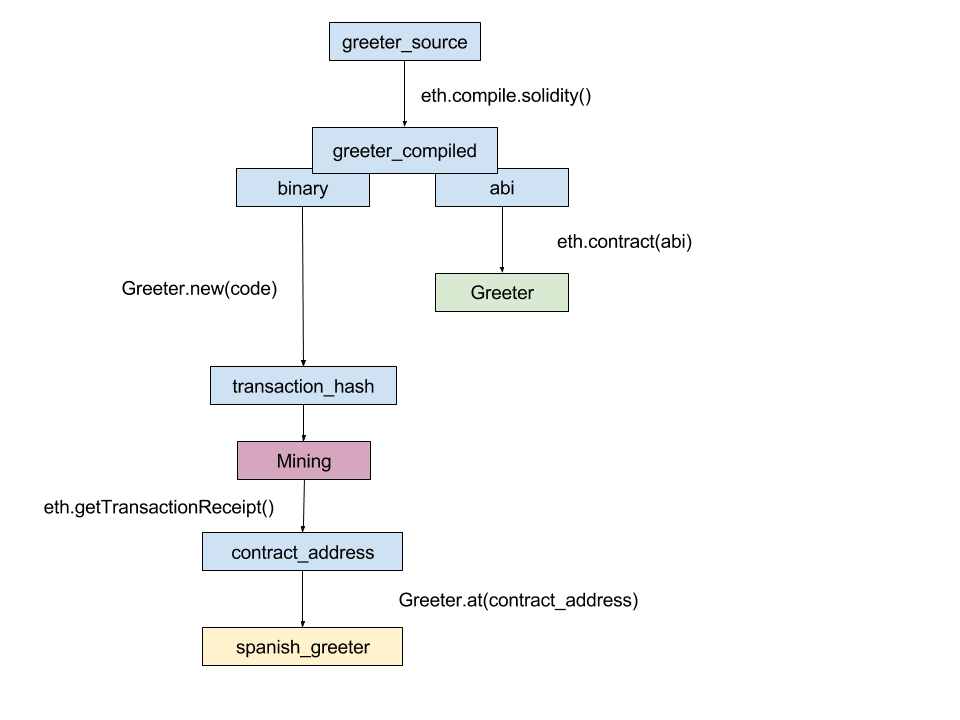
> greeter_source = 'contract mortal { address owner; ...'
> greeter_compiled = eth.compile.solidity(greeter_source);
> binary = greeter_compiled.greeter.code;
> abi = greeter_compiled.greeter.info.abiDefinition;
> Greeter = eth.contract(abi);
> transaction = Greeter.new('Hola', {from:primary, data: binary, gas: 1000000});
Now we mine the contract and test that it works as expected.
> miner.start(); admin.sleepBlocks(1); miner.stop();
> transaction_receipt = eth.getTransactionReceipt(transaction.transactionHash);
> spanish_gretter = Greeter.at(transaction_receipt.contractAddress);
> spanish_gretter.greet();
There you have it, we have created two simple contracts.
I hope this has been helpful and I’d appreciate any of your feedback if I’ve made any mistakes etc.
Thanks.